
Build and ship SCP: ReEnter mods.
Go from an empty Unreal Engine project to a fully operational, networked mod running on a dedicated SCP: ReEnter server. This guide covers cooked assets, Blueprints, PAK packaging, testing, and Steam Workshop delivery.
Mods in SCP: ReEnter can provide a rich set of runtime features, including:
- Static Meshes, Textures, Materials & Material Instances;
- 3D Replicated Audio via
Sound WaveandSound Cueassets; - Replicated Niagara Particle Systems;
- Custom Blueprint Actors with synchronized state;
- Lifecycle Logic hooked to mod loading, round start/end, and player connect/disconnect events;
- Persistent Replicated State automatically delivered to players joining mid-round;
- Dynamic Property Reflection & Wildcard Manipulation for safe interaction with player pawns, health, stamina, and game actors.
📋 Table of Contents
🏗️ Project & Content Setup
Learn how to install the Mod SDK, configure the directory tree, and create the entry Blueprint actor.
📦 Assets, Cooking & PAKs
Implement replicated meshes, audio, Niagara effects, and package them with shader bytecode.
🚀 Server Testing & Release
Test locally on dedicated server instances, upload via SteamCMD, and configure auto-download.
🛠️ 1. Prerequisites
Before creating and publishing mods, ensure you have the following components prepared:
- Up-to-date SCP: ReEnter Dedicated Server installation;
- Official Modding SDK containing a compatible Unreal Engine build and the
SCPModAPIplugin; - SteamCMD and a Steam account authorized to publish Workshop items for AppID
4088120; - Windows 64-bit development environment;
- A custom square preview image for your mod (e.g.
preview.png, 512x512 recommended).
Document Notation & Variables
Throughout this documentation, the following placeholders are used:
| Placeholder | Description | Example |
|---|---|---|
| <MOD_PROJECT> | Root directory of your mod's UE project | W:\UEProjects\dummy |
| <MOD_ENGINE> | Directory of the compatible Unreal Engine | W:\UE5.7.4\UE_5.7 |
| <PROJECT_NAME> | Name of the .uproject file | dummy |
| <MOD_ID> | Unique immutable alphanumeric identifier of the mod | MyCustomMod |
| <SERVER_ROOT> | Root directory of the SCP: ReEnter Dedicated Server | W:\Steam\steamapps\common\SCP ReEnter Dedicated Server |
| <WORKSHOP_ID> | Numeric Published File ID on Steam Workshop | 3786422757 |
<MOD_ID> must contain ONLY ASCII alphanumeric characters and underscores ([a-zA-Z0-9_]). Character casing and spelling must be 100% identical across directory names, mod.json, Blueprint paths, and Steam Workshop metadata. Never change this ID after publishing.
📁 2. Creating the Mod Project
Launch Compatible Unreal Engine
Start the Unreal Editor binary provided in the official modding SDK.
Create Blank Project
Create a fresh, empty project dedicated exclusively to mod content.
Close the Editor
Close the editor window to prepare the plugin directory.
Install SCPModAPI Plugin
Copy the provided SCPModAPI directory from the SDK into: <MOD_PROJECT>\Plugins\SCPModAPI.
Reopen Project & Compile
Open your project again. If the editor asks to rebuild missing modules, click Yes.
Enable SCPModAPI Plugin
Navigate to Edit → Plugins, search for SCPModAPI, check the Enabled box, and restart the editor when prompted.
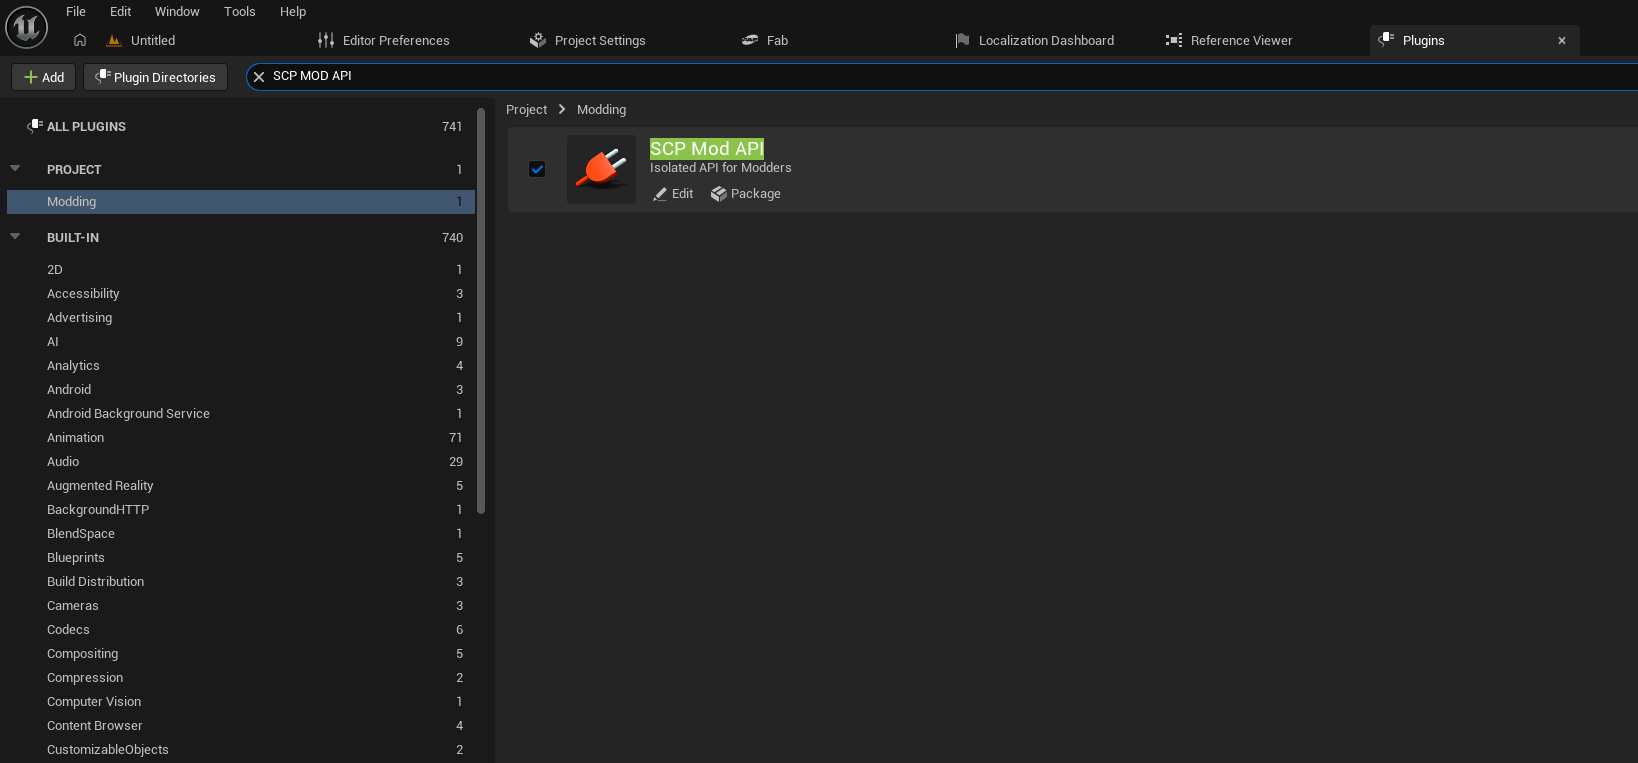
SCPModAPI plugin enabled with its module active.
SCPModAPI plugin folder into your final Steam Workshop upload package. The plugin is an authoring tool and already built into the dedicated server and client game binaries. The Workshop PAK must contain only cooked mod assets.
🗂️ 3. Mandatory Content Hierarchy
In the Unreal Content Browser, you must create a dedicated root folder under Content/Mods/ named exactly after your <MOD_ID>:
Content/Mods/<MOD_ID>/Recommended organizational folder layout for larger mods:
Content/Mods/<MOD_ID>/
├── BP_<MOD_ID>         (Entry Blueprint Actor)
├── Actors/             (Custom Replicated Blueprints)
├── Audio/              (Sound Waves, Sound Cues)
├── FX/                 (Niagara Systems)
├── Materials/          (Materials, Material Instances)
├── Meshes/             (Static Meshes)
└── Textures/ (Texture 2D Assets)Content/Mods/<MOD_ID>/. This includes base materials, textures, audio curves, and particle emitter dependencies. Any reference to assets located outside this root folder may work in the editor viewport, but will NOT be packaged into the client's PAK archive, resulting in missing textures, silent audio, or failed actor spawns in-game!
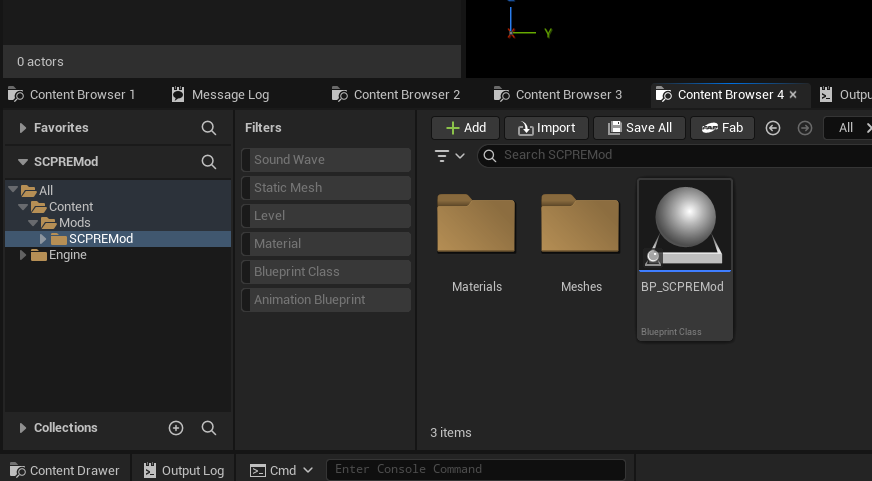
Content/Mods/<MOD_ID> directory with the entry Blueprint and structured asset subfolders.
🧩 4. Entry Blueprint Actor
The dedicated server initializes and executes your mod through an entry actor subclassed from the Mod API:
- Inside
Content/Mods/<MOD_ID>, right-click and select Blueprint Class. - In the search box under All Classes, select SCP Mod Base Actor (
SCPModBaseActor) as the parent class. - Name the Blueprint:
BP_<MOD_ID>. - Open the Blueprint and compile it to verify there are no errors.
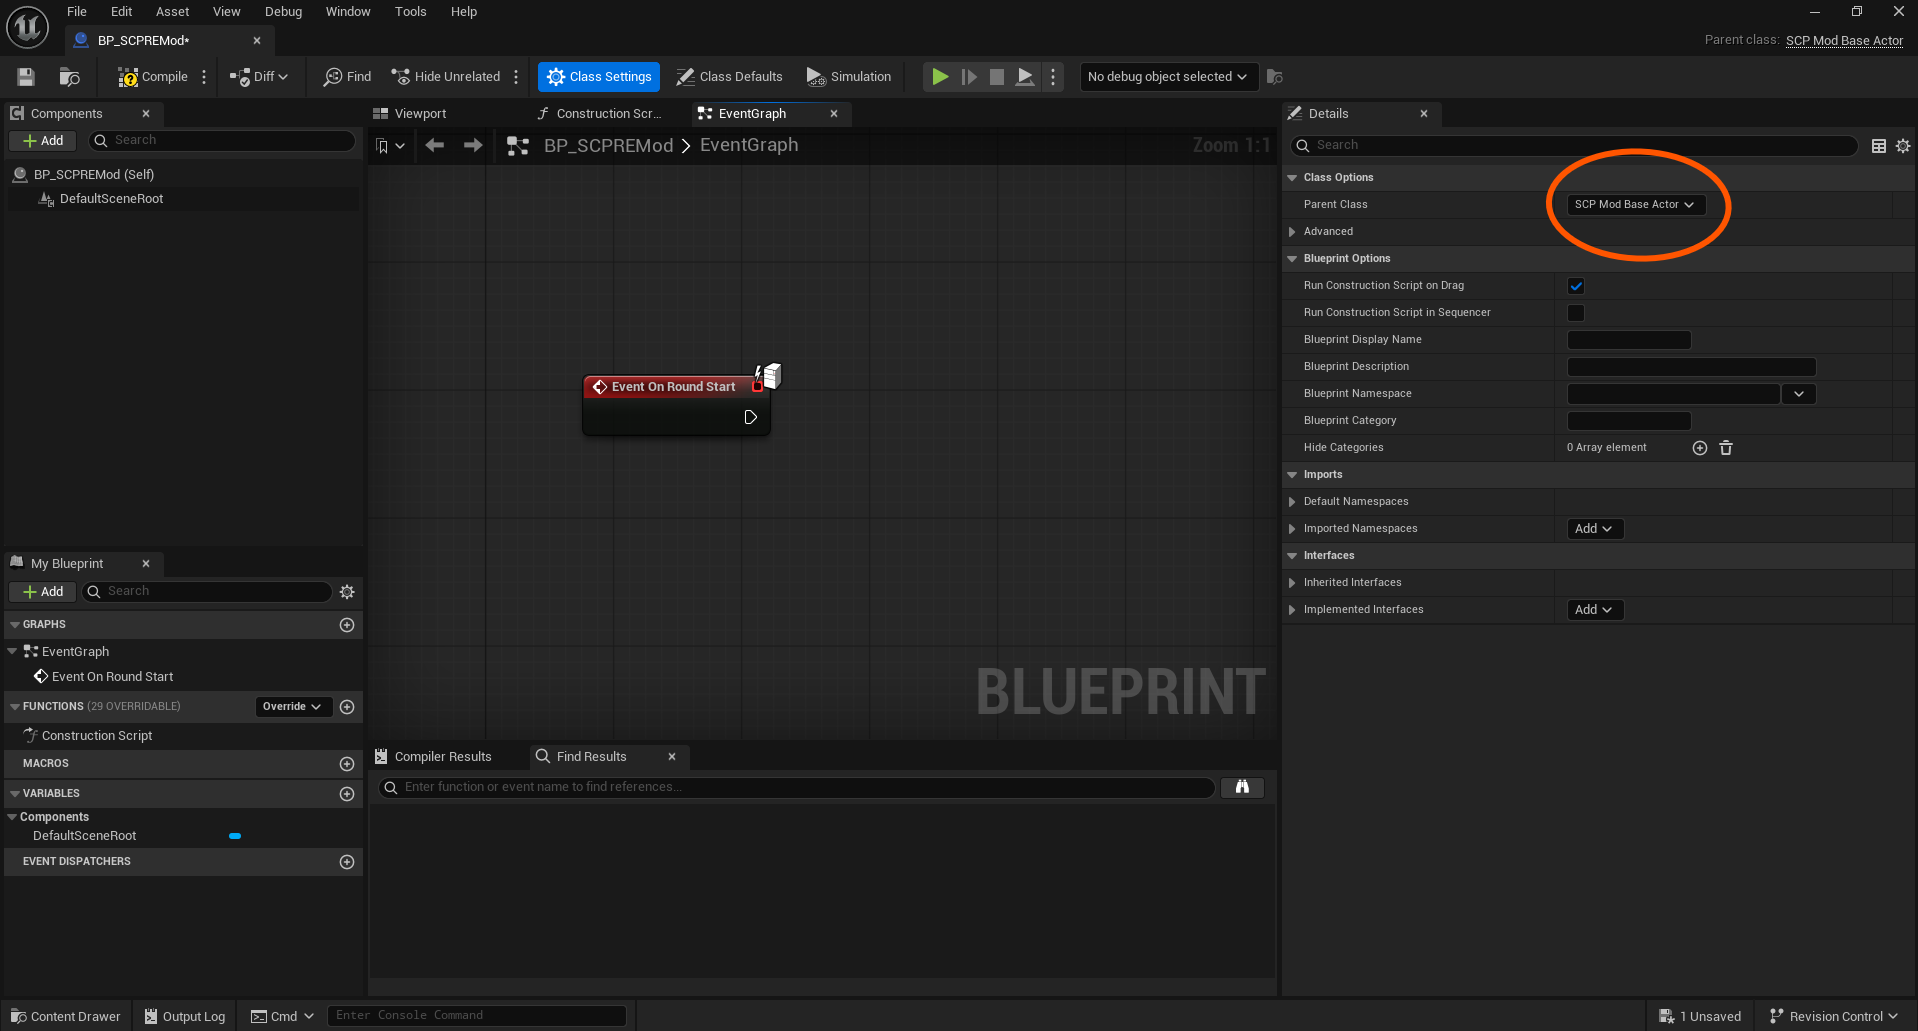
Class Settings panel for BP_<MOD_ID> with Parent Class set to SCP Mod Base Actor.
Available Lifecycle Events
Your entry actor provides built-in lifecycle hooks that execute automatically during match execution on the server:
On Mod Loaded
Fires once when the dedicated server mounts and initializes the mod subsystem upon server boot.
On Round Start
Fires every time a match round begins (e.g. after pre-round lobby countdown). This is where world props, ambient sounds, and hazard zones should be spawned.
On Player Join & On Player Leave
Triggered whenever an authenticated player connects or disconnects from the dedicated server.
On Round End
Fires when the round ends before returning to the lobby. Used to reset round-scoped variables and clean up transient entities.
On Mod Unloaded
Executes during server shutdown or when the mod is deactivated.
On Player Join. The built-in replicated prop and effect subsystems automatically transmit and spawn active world objects for late-joining players. Spawning in both events will duplicate props for new clients! Avoid using Event Tick for spawning or asset lookups.
🔗 5. Asset Referencing Paths
The SCPModAPI nodes accept a Mod ID string and a Relative Path string. Do NOT prepend /Game/Mods/... to the relative path argument.
| Asset in Project Content | Relative Path in Node |
|---|---|
Content/Mods/MyMod/Meshes/SM_Crate | Meshes/SM_Crate.SM_Crate |
Content/Mods/MyMod/Audio/S_Alarm | Audio/S_Alarm.S_Alarm |
Content/Mods/MyMod/FX/NS_Smoke | FX/NS_Smoke.NS_Smoke |
Content/Mods/MyMod/Actors/BP_Door | Actors/BP_Door.BP_Door |
Get Mod Id node directly into the Mod ID pin of all API nodes. This guarantees your code stays clean and resilient against renaming. Always use the explicit Folder/Asset.Asset notation for maximum diagnostic clarity.
🧱 6. Adding Supported Assets & Replication
6.1 Static Meshes, Textures & Materials
- Import your 3D mesh (FBX/OBJ) into
Meshes/, and textures intoTextures/. - Create your Material or Material Instance inside
Materials/and assign it to the mesh. - In
BP_<MOD_ID>underOn Round Start, add aSpawn Replicated Mod Propnode. - Connect
Get Mod Idto theMod IDpin. - In
Relative Mesh Path, enter (for example)Meshes/SM_Crate.SM_Crate. - Set the
Spawn Transformin Unreal units (100 units = 1 meter).
Materials and textures applied to the mesh are loaded automatically as dependencies. To dynamically override a material at runtime, store the returned SCP Mod Replicated Prop reference and call Set Replicated Material From Mod Path. This update is automatically replicated to all connected and late-joining clients.
Use Complex Collision As Simple unless geometric precision is strictly required.
6.2 3D Replicated Audio
- Import your WAV audio file into
Audio/. - Use a
Sound Wavedirectly or wrap it in aSound Cue(for spatial randomization or pitch modulation). - For ambient looping audio, enable the Looping property within the sound asset.
- In your Blueprint graph, call
Spawn Replicated Mod Sound. - Configure the relative path, transform, and parameters:
Auto Play— Starts playback immediately upon spawn;Spatialized— Enables 3D positional audio;Inner Radius— Radius within which audio plays at maximum volume;Falloff Distance— Maximum hearing distance where sound fades to silence;Volume Multiplier&Pitch Multiplier.
The returned SCP Mod Replicated Effect object can be controlled at runtime with Set Replicated Mod Sound Playing or Restart Replicated Mod Sound. Playback timestamp and state are synchronized over the network so late-joining players hear long-running ambient sounds at the exact current position without restarting.
Replicated API nodes.
6.3 Niagara Particle Systems
- Inside
FX/, create or copy a complete Niagara System (not just an isolated emitter). - Move all referenced materials, textures, and sprites inside your mod root directory.
- Ensure you configure explicit Fixed Bounds on the Niagara System to prevent premature camera culling.
- In your graph, call
Spawn Replicated Mod Niagara(withAuto Activateenabled).
Control the effect dynamically using Set Replicated Mod Niagara Active. The dedicated server replicates lifecycle state and timestamps, while client GPUs render and simulate particles locally.
6.4 Custom Blueprint Actors (Advanced)
For complex interactive gameplay elements (such as scripted doors, interactive terminals, or hazards), create a custom Blueprint Actor inside Actors/:
- In Actor Defaults, enable
Replicates(andReplicate Movementif the actor moves). - Spawn it on the server using
Spawn Replicated Mod Actor By Path. - Ensure all custom gameplay variables are explicitly configured with
ReplicatedorReplicatedUsing.
6.5 Generic Asset Loaders
For auxiliary logic, the API provides helper loaders: Load Mod Static Mesh, Load Mod Material, Load Mod Sound, Load Mod Niagara System, Load Mod Class, and Load Mod Asset Generic.
UObject into memory on that specific process, but does NOT replicate it across the network. Any visual or audible gameplay entity should be instantiated using the dedicated Spawn Replicated ... API nodes.
6.6 Interacting with Pawns & Gameplay Variables (Reflection & Wildcards)
Mods frequently need to read or mutate character properties (such as player Health, Stamina, bIsExhausted, movement speeds, or SCP attributes) without having a static compile-time class dependency on the game's C++ codebase.
Inside the SCP|Modding|Reflection category, SCPModAPI provides a native reflection engine exposed directly to Blueprints.
A. Blueprint Wildcard Nodes (Universal Auto-Adapting Pins)
Using Unreal Engine's CustomThunk and CustomStructureParam pipeline, these nodes dynamically adapt their pin types and colors to any connected variable:
Get Object Property (Wildcard)
Reads a variable from any UObject / APawn / AActor by string/name.
- Target Object: Reference to the actor or pawn.
- Property Name: Exact variable name (e.g.
Health,Stamina,ConfigHumanSprintSpeed). - Out Value (Wildcard): Output pin that automatically adapts to
Float,Integer,Boolean,Vector,String, orObject. - Return Value (Boolean):
Trueif the property exists and was copied successfully.
Set Object Property (Wildcard)
Mutates a variable on an object with automatic replication synchronization and change detection.
- In Value (Wildcard): New value to assign.
- Auto Trigger On Rep (Boolean, default: True): If the property has a network replication callback (
ReplicatedUsing=OnRep_...), the server automatically invokes theOnRepfunction to prevent state desynchronization. - Out Was Modified (Boolean): Returns
TrueONLY if the new value differed from the current value and was modified.
B. Explicit Type-Safe Helper Nodes
For convenience and strict type guarantees, dedicated typed nodes are also available with automatic numeric conversion:
| Getter Node | Setter Node | Supported Types / Features |
|---|---|---|
| Get Object Float Property | Set Object Float Property | float, double, numeric int conversions |
| Get Object Int Property | Set Object Int Property | int32, int64, uint8 (Enums) |
| Get Object Bool Property | Set Object Bool Property | bool flags and bitfields |
| Get Object String Property | Set Object String Property | FString, FName, FText |
| Get Object Vector Property | Set Object Vector Property | FVector 3D coordinates |
| Get Object Reference Property | Set Object Reference Property | UObject* / AActor* references |
C. Dynamic Function Invocation & Property Queries
Has Object Property— Pure node returningTrueif the property exists on the target class.Has Object Function— Pure node returningTrueif a callable function exists on the target class.Call Object Function By Name— Dynamically executes any UFunction on the target object with optional space-separated parameters (e.g."ApplyDamage 50.0").
Target Object is valid before reading or setting properties. When writing to network-replicated gameplay attributes, keep Auto Trigger On Rep enabled so health bars, stamina bars, and character animations update instantaneously across all clients.
6.7 Custom Inventory Items Coming Soon
Create collectables, consumables and items with your own server-side Blueprint use effects. They use the normal eight inventory slots, icons, selection, swapping, dropping and interaction key; no edit to AllItemsEnum is required.
Step 1 — Create an item definition
- In the Content Browser, choose Miscellaneous → Data Asset → SCP Mod Item Definition.
- Save it as
/Game/Mods/<MOD_ID>/Items/DA_Bandage. TheItemsfolder is required: dedicated servers discover definitions there even without anAssetRegistry.bin. - Set a stable
ItemId, for exampleBandage, plusDisplayName,InventoryIconandWorldMesh.
The full ID is ModItem:<MOD_ID>.Bandage. Different mods can each have a Bandage without replacing built-in items. Use the same mod ID as your mod.json; IDs use ASCII letters, digits and underscores, up to 96 characters. Keep IDs and package paths stable after publishing.
Keep icons, meshes, sounds and optional behavior Blueprints inside the same mod folder, in sibling directories such as UI/, Meshes/, Audio/ and Behaviors/. Item definition references to another mod or private base-game assets are rejected.
Step 2 — Configure appearance and use
WorldMesh supplies the physical pickup. Give it simple collision (box, capsule or convex hull) and set Collision Complexity → Simple And Complex. Use Complex Collision As Simple cannot simulate a physics pickup. An invalid collision setup rejects spawning or dropping; a failed drop retains the inventory item.
HeldMesh is optional and defaults to WorldMesh. Adjust FirstPersonTransform relative to the local player's camera, and ThirdPersonTransform relative to ThirdPersonSocket (default: hand_r) for other players.
| Effect | What successful use does |
|---|---|
None | A collectable with no use action. |
Heal | Restores EffectAmount health through the game's healing path. |
RestoreStamina | Sets stamina to EffectAmount, matching the existing stimulant behavior. |
Custom | Runs your assigned Blueprint use behavior on the server. |
Set UseDurationSeconds (0–300 seconds) and optionally UseSound. With bConsumedOnSuccessfulUse enabled, the instance is removed only after successful use. Changing slots, dropping the item or becoming unable to act cancels the channel.
Example bandage: choose Heal, set EffectAmount = 25, UseDurationSeconds = 1, and enable consumption on success.
For Custom, create a Blueprint derived from SCP Mod Item Use Behavior, override Apply, and assign its class to UseBehavior. Apply receives the player's pawn and instance GUID. Return true after applying the effect, or false to retain a consumable when the effect fails. Keep Apply synchronous; the inventory handles the use delay and consumption. Use the existing SDK reflection and replicated-effects nodes for your gameplay logic.
Step 3 — Spawn or grant the item
- Spawn Mod Item Pickup: pass the definition and world transform. The replicated pickup uses the usual interaction key. A failed spawn returns null.
- Give Mod Inventory Item: pass the player's pawn and definition. Check the boolean result;
OutSlotis the occupied slot on success and-1on failure. A full inventory rejects the grant.
Run these nodes on the server from your entry Blueprint. Use On Round Start for shared world pickups, or On Player Join for an intentional starting item. Avoid spawning shared pickups once per joining player. Each instance keeps its GUID and state during transfers; the separate zip-tie counter is unchanged.
Step 4 — Validate, cook and test
- Run Get Validation Errors on the definition and resolve every reported issue. Duplicate IDs within a mod reject registration rather than overwrite another item.
- Follow Packaging & Cooking and Building the PAK. Include the whole mod directory, item definitions, behavior Blueprints, visual/audio dependencies and required shader libraries.
- Publish the cooked content through the existing Workshop upload flow. No new
mod.jsonfield or separate item upload is required. Do not include SDK plugin files or native DLLs in the PAK. - Test with a dedicated server and two clients: icon/name, local and remote held mesh, interaction pickup, swap/drop/re-pickup with the same GUID, full inventory rejection, successful/failed/cancelled use, and a player joining after pickups exist.
The server registers definitions after mounting the mod. Clients register them after package preload and before reporting Workshop readiness; pickups wait for that readiness before replicating. Invalid definitions fail loading. Verify the cooked PAK and actual Steam delivery before release: editor PIE tests alone do not cover them.
Restart the session when removing or replacing an item-providing mod. Existing instances require their definitions and are not converted into built-in items on hot removal.
🍳 7. Packaging & Cooking Configuration
Unreal Engine does not automatically cook assets that are not directly referenced by a project's default startup map. To ensure your mod assets are properly cooked:
- Open Edit → Project Settings → Packaging.
- In Additional Asset Directories to Cook (under Packaging advanced settings), add:
/Game/Mods/<MOD_ID>. - Ensure Use Io Store is unchecked (disabled). Standalone mod PAKs require traditional cooked loose files for compatibility with
UnrealPak.exe. - Save all dirty assets (File → Save All).
- Right-click your mod root folder in the Content Browser and select Fix Up Redirectors in Folder.
- Compile your Blueprint actor and ensure all errors and critical warnings are resolved.
WindowsServer). Clients download and render this PAK file, so it must contain full client rendering assets, textures, sounds, and Niagara pipelines.
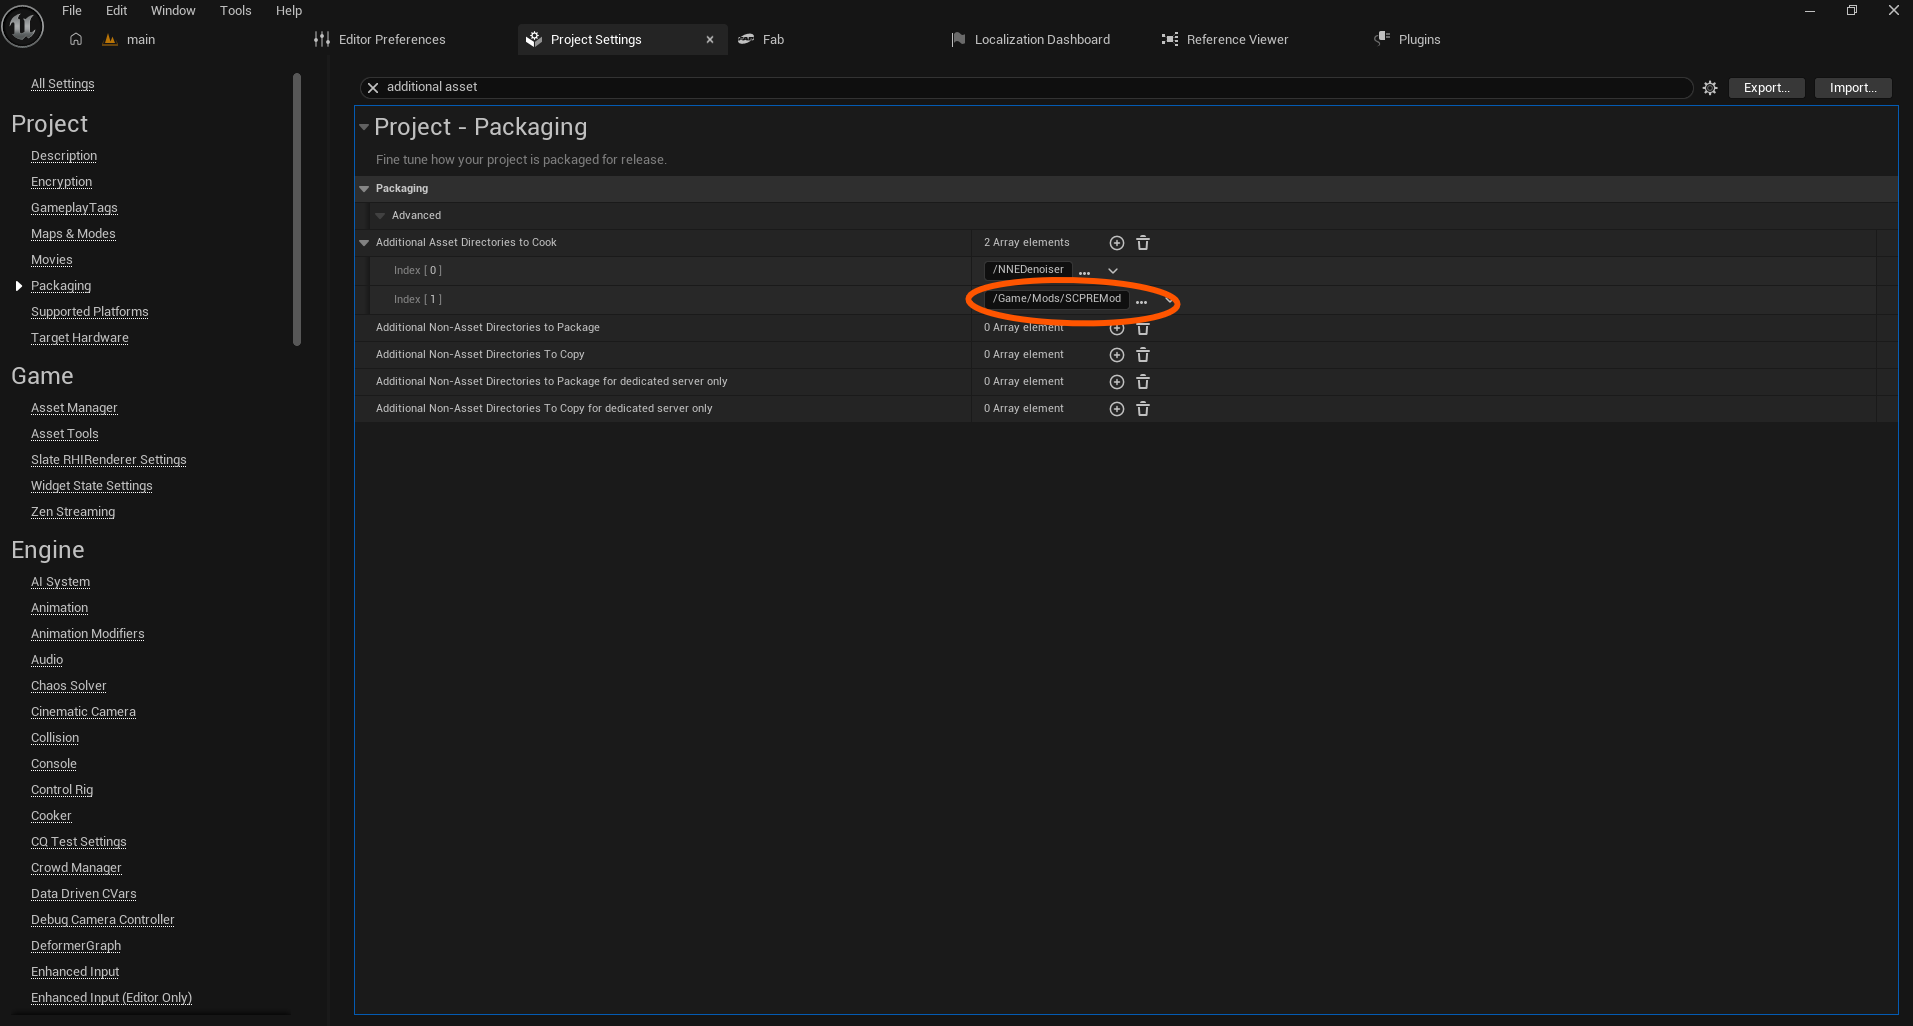
/Game/Mods/<MOD_ID> in Additional Asset Directories to Cook.
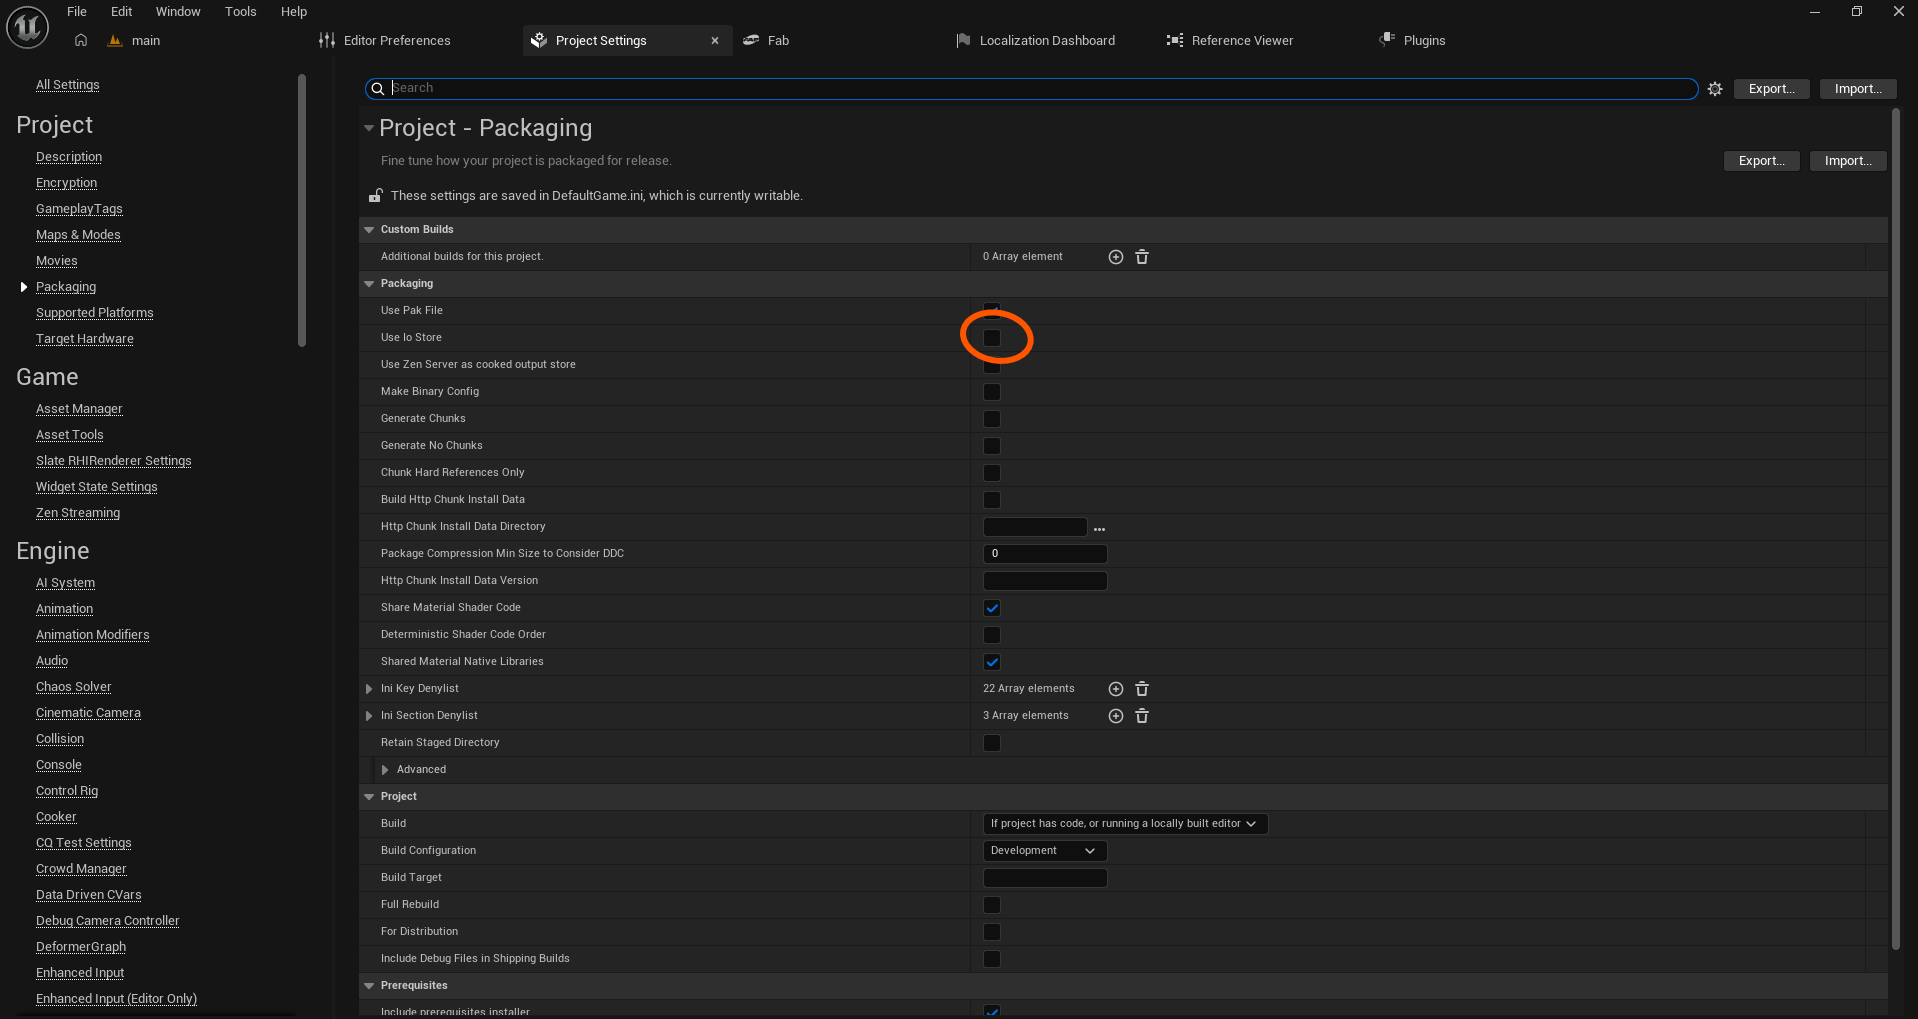
UnrealPak.exe.
Then navigate to Platforms → Windows → Cook Content and wait for the completion notification. Cooked binaries will be generated at:
<MOD_PROJECT>\Saved\Cooked\Windows\<PROJECT_NAME>\Content\Mods\<MOD_ID>\The folder will contain cooked .uasset, .uexp, and optionally .ubulk files. In addition, the root cooked Content directory will contain vital shader bytecode archives:
ShaderArchive-<PROJECT_NAME>-PCD3D_SM5-PCD3D_SM5.ushaderbytecode
ShaderArchive-<PROJECT_NAME>-PCD3D_SM6-PCD3D_SM6.ushaderbytecode
📦 8. Building the PAK File
Create a staging directory: <MOD_PROJECT>\WorkshopContent. Do NOT place raw un-cooked source files, C++ source, plugins, passwords, or VDF scripts in this folder — only the final .pak file intended for players.
Use the following PowerShell script to automatically build the PAK with the correct mount points and shader libraries. Adjust the top 4 variables for your environment:
# ==========================================
# SCP: ReEnter Mod Packaging Script
# ==========================================
$ModProject     = 'W:\UEProjects\dummy'
$ModEngine      = 'W:\UE5.7.4\UE_5.7'
$ProjectName    = 'dummy'
$ModId          = 'MyCustomMod'

$CookedContent   = Join-Path $ModProject "Saved\Cooked\Windows\$ProjectName\Content"
$CookedMod       = Join-Path $CookedContent "Mods\$ModId"
$WorkshopContent = Join-Path $ModProject 'WorkshopContent'
$PakFile         = Join-Path $WorkshopContent "$ModId.pak"
$ResponseFile    = Join-Path $ModProject 'pak_list.txt'
$PakMount        = "../../../$ProjectName/Content/Mods/$ModId"

New-Item -ItemType Directory -Force -Path $WorkshopContent | Out-Null

# Recursively collect cooked assets to preserve subfolder hierarchy and avoid filename collisions
$CookedFiles = Get-ChildItem -Path $CookedMod -Recurse -File
$PakEntries = [System.Collections.Generic.List[string]]::new()

foreach ($File in $CookedFiles) {
    $RelativePath = $File.FullName.Substring($CookedMod.Length).TrimStart('\', '/').Replace('\', '/')
    $PakEntries.Add(('"{0}" "{1}/{2}"' -f $File.FullName, $PakMount, $RelativePath))
}

# Add required shader bytecode libraries
$ShaderSM5 = Join-Path $CookedContent "ShaderArchive-$ProjectName-PCD3D_SM5-PCD3D_SM5.ushaderbytecode"
if (Test-Path $ShaderSM5) {
    $PakEntries.Add(('"{0}" "{1}/ShaderArchive-{2}-PCD3D_SM5-PCD3D_SM5.ushaderbytecode"' -f $ShaderSM5, $PakMount, $ProjectName))
}
$ShaderSM6 = Join-Path $CookedContent "ShaderArchive-$ProjectName-PCD3D_SM6-PCD3D_SM6.ushaderbytecode"
if (Test-Path $ShaderSM6) {
    $PakEntries.Add(('"{0}" "{1}/ShaderArchive-{2}-PCD3D_SM6-PCD3D_SM6.ushaderbytecode"' -f $ShaderSM6, $PakMount, $ProjectName))
}

$PakEntries | Set-Content -LiteralPath $ResponseFile -Encoding ascii

# Remove existing PAK archive to avoid UnrealPak overwrite errors
if (Test-Path $PakFile) {
    Remove-Item $PakFile -Force
}

& "$ModEngine\Engine\Binaries\Win64\UnrealPak.exe" $PakFile "-create=$ResponseFile"
& "$ModEngine\Engine\Binaries\Win64\UnrealPak.exe" $PakFile -list
Mount Point Verification
The -list command output must confirm a mount point matching:
../../../<PROJECT_NAME>/Content/Mods/<MOD_ID>/ShaderArchive-...-PCD3D_SM5... and ShaderArchive-...-PCD3D_SM6... are present in the PAK root. Missing shader archives are the #1 cause of bugs where the dedicated server has physical prop collision, but the client renders an invisible object or crashes!
..), or files attempting to overwrite protected base game content.
🧪 9. Local Server Testing (mod.json)
Before publishing to Steam Workshop, test your mod locally on your dedicated server installation. In your server directory, create:
<SERVER_ROOT>\SCPReEnter\Mods\<MOD_ID>\
├── <MOD_ID>.pak
└── mod.json
Sample mod.json Manifest
{
  "ModId": "MyCustomMod",
  "WorkshopId": 0,
  "Name": "My Server Mod",
  "Version": "1.0.0",
  "Author": "Your Name",
  "Description": "Replicated content mod for my server.",
  "EntryActorClass": "/Game/Mods/MyCustomMod/BP_MyCustomMod.BP_MyCustomMod_C",
  "Priority": 500,
  "bIsEnabled": true,
  "RequiredEngineVersion": "5.7"
}
EntryActorClass must be the complete path to the generated Blueprint class and MUST end with the _C suffix. If your Blueprint is located in a subfolder, include it (e.g. /Game/Mods/MyCustomMod/Actors/BP_MyCustomMod.BP_MyCustomMod_C).
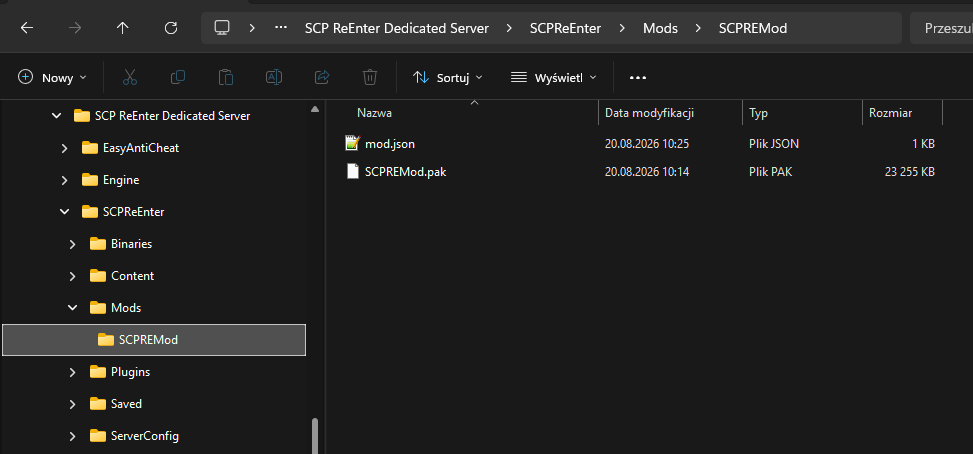
mod.json manifest.
Start your dedicated server and check the console output. Look for the following initialization log messages:
[ModSubsystem] Resolving class for mod '<MOD_ID>'
[ModSubsystem] Resolved ModActorClass
[ModActor] Mod '<MOD_ID>' OnModLoaded executed.
[ModSubsystem] Spawned and initialized mod actor
🚀 10. Publishing to Steam Workshop
10.1 VDF Configuration File
Alongside your project (outside of WorkshopContent), create upload_item.vdf:
"workshopitem"
{
    "appid"              "4088120"
    "publishedfileid"    "0"
    "contentfolder"      "W:/UEProjects/MyModProject/WorkshopContent"
    "previewfile"        "W:/UEProjects/MyModProject/preview.png"
    "visibility"         "2"
    "title"              "My Server Mod"
    "description"        "Content mod used by my SCP: ReEnter server."
    "changenote"         "Initial release"
}
visibility options: 0 (Public), 1 (Friends Only), 2 (Private — Recommended for initial testing), 3 (Unlisted).
10.2 SteamCMD Upload Execution
Execute SteamCMD from PowerShell:
& 'E:\SteamLibrary\steamapps\common\SteamCMD\steamcmd.exe' +login YOUR_STEAM_LOGIN +workshop_build_item 'W:\UEProjects\MyModProject\upload_item.vdf' +quitEnter your Steam password and Steam Guard code when prompted. Upon successful upload, SteamCMD will print your new Published File ID. Update publishedfileid in your VDF file with this number so subsequent executions update the existing Workshop item rather than creating duplicates.
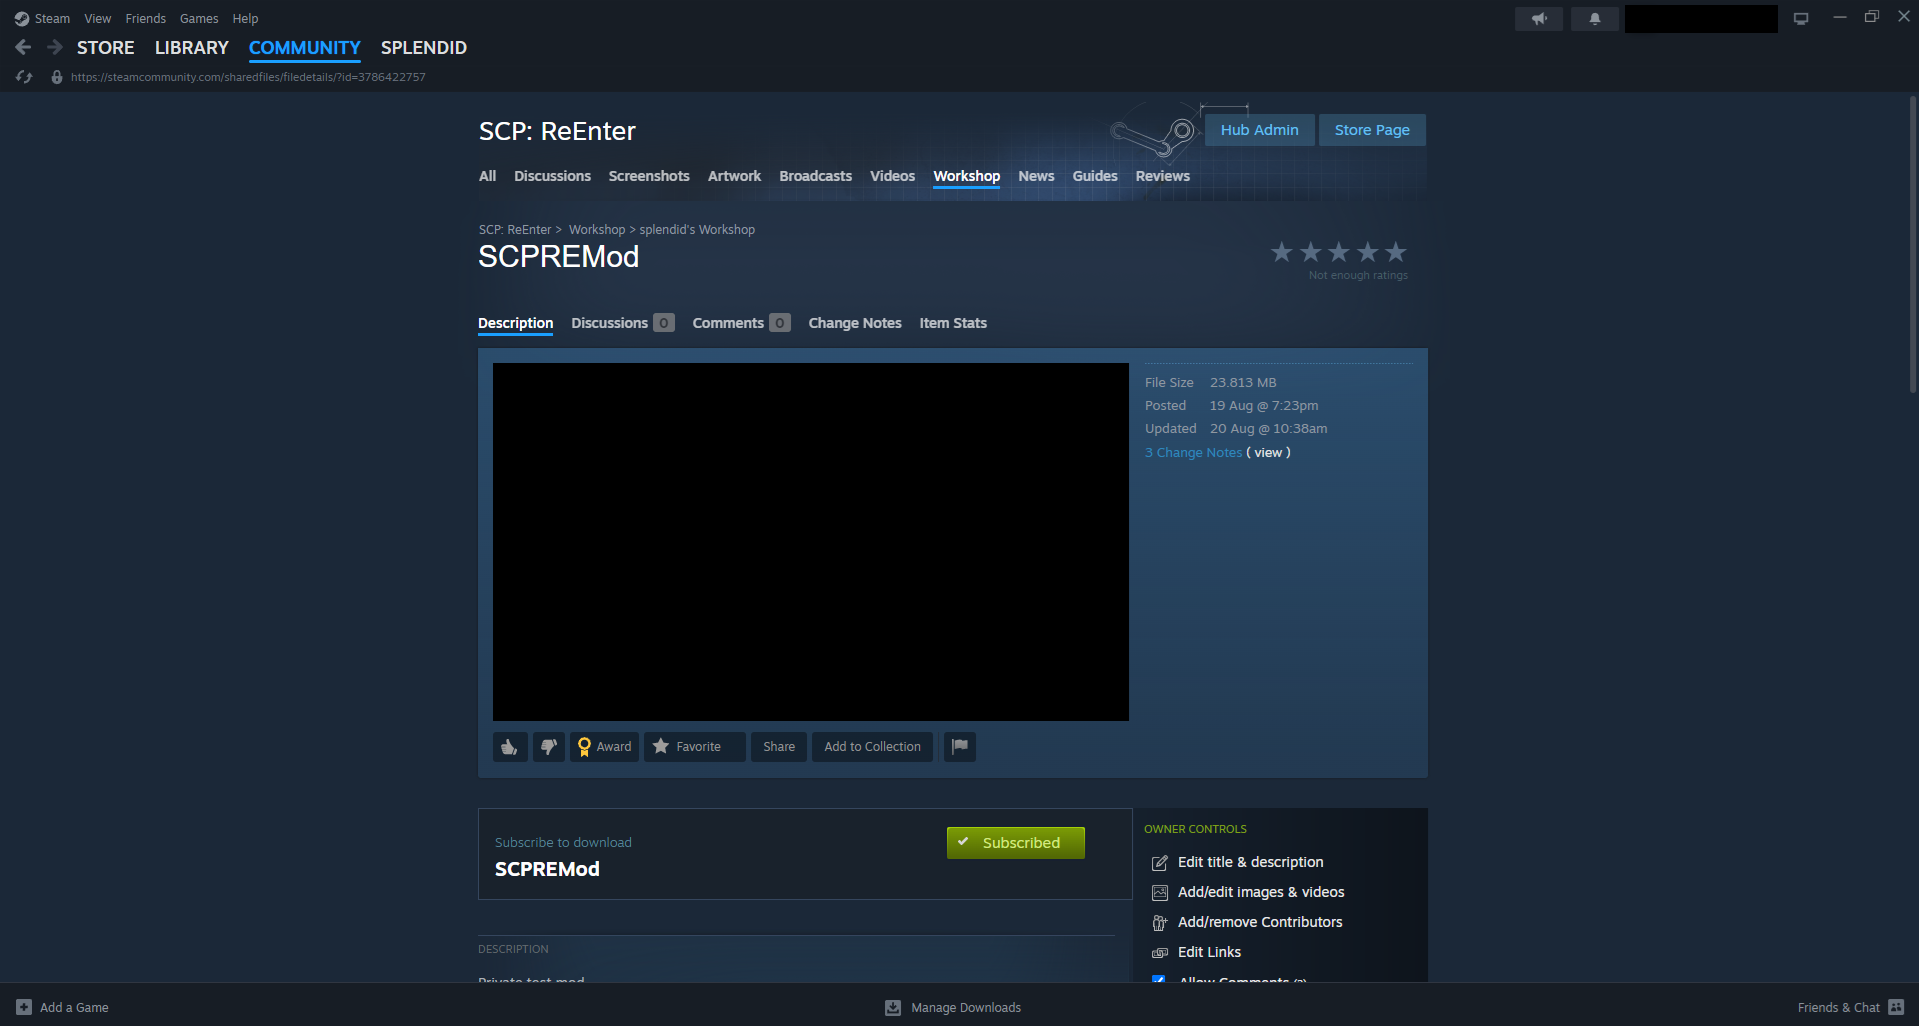
?id=<WORKSHOP_ID> parameter.
☁️ 11. Enabling Automatic Client Downloads
Once your mod is published to Steam Workshop:
- Set the real
<WORKSHOP_ID>in your server'sSCPReEnter/Mods/<MOD_ID>/mod.jsonunder"WorkshopId". - Verify that the PAK on your server is the exact same binary artifact uploaded to Steam Workshop.
- Check your server instance configuration at:
<SERVER_ROOT>\SCPReEnter\ServerConfig\<PORT>\ServerConfig.ini.
[/Script/SCPReEnter.ServerSettings]
bEnableWorkshopContentDelivery=True
ModSyncTimeoutSeconds=300.0
MaxWorkshopTotalSizeMB=500
Restart the server and connect with a clean game client (one that has not manually copied the mod files). The server sends the Workshop ID, expected size, and SHA-1 checksum. The client downloads the item, verifies integrity, mounts the archive, and only then initiates player spawning:
[Workshop] Player <STEAM_ID> mods ready. Proceeding to spawn.🧪 12. Server Owner Acceptance Checklist
Before opening your modded server to public players, execute a dual-process test (1 Dedicated Server instance + 1 Clean Client instance) to verify all criteria:
- Client has no pre-existing local copy of the mod PAK.
- Client automatically downloads the correct Workshop ID during pre-login handshake.
- Server logs class resolution and successful mod actor instantiation.
- Client spawn is delayed until synchronization and PAK mounting finish.
- 3D meshes are visible with proper materials and collision geometry.
- Textures render cleanly without fallback checkerboard patterns.
- 3D Audio is audible, spatialized, and attenuates with distance.
- Niagara particle VFX simulate and do not suffer from camera culling glitches.
- Late-joining players immediately see and hear active world props in sync.
- Round restart cleans up previous entities without spawning duplicates.
- Server console shows 0 replication errors or continuous correction spam.
🔄 13. Updating a Published Mod
When releasing a new version or bugfix for your mod, follow this strict update sequence:
Modify Assets & Blueprints
Apply your modifications inside the Unreal Editor.
Increment Version
Increment the "Version" field in your mod.json.
Re-cook for Windows
Run Platforms → Windows → Cook Content.
Rebuild PAK File
Run the PowerShell packaging script and verify shader archive inclusion.
Update VDF Changelog
Ensure publishedfileid matches your existing item and update changenote.
Upload via SteamCMD
Publish the new version and wait 2–5 minutes for Steam CDN propagation.
Deploy PAK to Server & Restart
Copy the updated PAK to SCPReEnter/Mods/<MOD_ID>/ and reboot the server.
🗑️ 14. Disabling or Removing Mods
To safely deactivate a mod from an active dedicated server without causing state corruption:
- Stop the dedicated server process completely.
- Either delete the mod folder from
SCPReEnter/Mods/<MOD_ID>or set"bIsEnabled": falseinsidemod.json. - Verify that no other active mod lists this mod as a prerequisite dependency.
- Start the dedicated server again.
🛠️ 15. Common Issues & Troubleshooting
Server cannot find BP_<MOD_ID>
Verify that your EntryActorClass ends with _C (e.g. /Game/Mods/MyMod/BP_MyMod.BP_MyMod_C). Check your PAK listing with UnrealPak.exe <PakFile> -list to confirm the Blueprint was actually cooked into the archive.
Server has collision, but clients cannot see the model
The client's PAK is either missing shader bytecode archives (ShaderArchive-<PROJECT_NAME>-PCD3D_SM5...) or the client is running a different game engine build. Never attempt to fix this by locally spawning actors on the client — this causes immediate network desynchronization.
failed to download required ID <WORKSHOP_ID>
Verify that the Workshop item is published, not deleted, and that the client's Steam account has permission to view it (if set to Friends Only / Private). Detailed download error logs can be inspected in the client's WorkshopRuntime.log.
Client downloads PAK but gets immediately disconnected
The SHA-1 cryptographic hash of the server's local PAK does not match the file downloaded from Steam Workshop. Compare hashes in PowerShell:
Get-FileHash 'W:\Server\SCPReEnter\Mods\MyMod\MyMod.pak' -Algorithm SHA1
Get-FileHash 'W:\Steam\steamapps\workshop\content\4088120\...\MyMod.pak' -Algorithm SHA1
If the hashes differ, re-upload the server's exact PAK file to Steam Workshop or overwrite the server copy with the uploaded file.
Material, Audio, or Niagara effect does not work
Ensure all dependent textures, material instances, audio cues, and emitters are placed inside Content/Mods/<MOD_ID>/. Confirm the cook target was Windows and that the asset path passed to the API node does NOT include /Game/Mods/.
Where to Find Diagnostic Logs
- Server Console & Logs: Dedicated Server standard output and
<SERVER_ROOT>\SCPReEnter\Saved\Logs\; - Client Game Logs:
%LOCALAPPDATA%\SCPReEnter\Saved\Logs\SCPReEnter.log; - Client Workshop Delivery Logs:
%LOCALAPPDATA%\SCPReEnter\Saved\Logs\WorkshopRuntime.log.
✅ 16. Final Release Checklist
- Project uses compatible Unreal Engine build (UE 5.7.4) and official
SCPModAPI. - All mod assets are located strictly under
Content/Mods/<MOD_ID>/. - Entry Blueprint inherits from
SCP Mod Base Actor. - All visual and audio logic spawns via
ReplicatedAPI nodes on the server. - Content was cooked for the Windows platform target.
- PAK file contains cooked assets AND both PCD3D_SM5 / PCD3D_SM6 shader archives.
-
mod.jsoncontains validModId,WorkshopId, and_CsuffixedEntryActorClass. - Steam Workshop contains the byte-for-byte identical PAK file used on the server.
-
bEnableWorkshopContentDelivery=Trueis configured inServerConfig.ini. - Dual-process verification confirms clean sync and smooth late-joining.